In those days, compressed HD video files took a load of cpu power to play or seek through, having only a dual core spu! So this page ir probably very out of date.
[Kdenlive has an auto proxy clip maker for large HD files, so once those have been made - time for a coffee or two if you have a low-spec CPU - playing and cutting is much smoother, but with on-screen quality loss of course from the proxies.]
I use bash to sort my files into folders, by date:
Taking still images from MTS
I use mpv to get stills from my film, just hitting "S".Then I run a couple of commands on them to write the EXIF date to them...
and to adjust the date so that it better matches the real date of the video it came from, do
that will set the date on all files, leaving the time stamp as-is
The below description has not been updated!!
Converting MTS movie files into films
Although it's possible to edit MTS files (though they don't like seeking) and directly render to a finished format with Kdenlive (mpeg2, mp4, h264, webm, vob etc), my rendered movies have been showing pauses at the points where clips join. Even with ffmpeg and melt built from latest snapshots.I think there's something happening with Kdenlive's MLT in dealing with the compressed MTS files, because the clips are good with no frozen frames if i join them after converting them to mpeg2 or m2ts.
It's like, Kdenlive says, "Oh, the end of a clip, what do we do now? Oh, the next clip, let's start it.." And with that behaviour, there will be frozen frames at the end of nearly every clip. There is a solution though - and at first I tried transcoding to raw formats (see my page transcoding MTS) but results were not perfect either and it ate up hours of CPU intensive work.
What we need to do is simply turn on "Overwrite mode" in kdenlive and move the next clip along to the left so that it slightly (or greatly) overlaps the end of the clip before it. That way MLT will not get to see the end of the clip, but the next one will be starting already!!
Editing films with Kdenlive
For detailed install instruction see my install Step 2 page. I highly recommend doing long video productions/encodes on a desktop PC with a modern multi-core CPU (3rd gen i5 at least) and plenty of RAM (>8gb), as laptops are just not built for it, although they are getting much faster).Official Manual here.. http://userbase.kde.org/Kdenlive/Manual
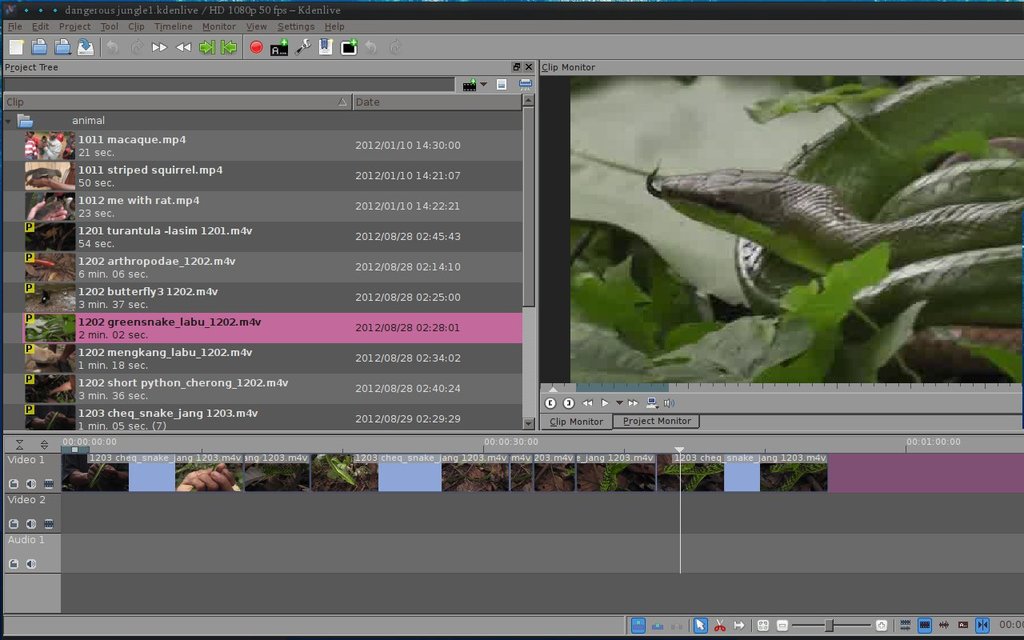
1. Add clips to the Project Tree
Click on the black film icon just above the clip tree to open video files from a folderThe clips may take some time to load and you can only use them once they've all appeared as thumbs, and the last clip appears in the Clip monitor.
The cpu will slow down once they're loaded.
When the files open the profile should be set to what files you are using e.g. HD 1080p 50fps 16/9 -this can be set as default also in Settings >Configure Kdenlive >Project Defaults.
Also set the default kdenlive project folder >Configure Kdenlive >Environment >Default folders tab.
You should set videos of over 1000px to have proxy clips made, so that seeking through them in the Timeline will be much smoother than trying to seek huge, compressed and cpu-intensive movie files. (Configure Kdenlive > Project Defaults)
When using proxy clips you will have to leave the PC to build all the clips when you add them to the Project before you can get on with the video editing.
In the Project Tree you can make folders and drag and drop clips into them, or select a folder and click on the add clips button to add new clips into the folder. This is indispensible for a project made of many clips from all sorts of directories on disk -otherwise you'd have them all mixed up, ordered just by file names.
You can close some of the Kdenlive components so that its less cluttered, under View (you just need Clip tree, Clip monitor and Project monitor, and Effects stack if you add effects and have to adjust them)
Shortcut Keys
You want to make some short-cut keys to help speed up the work: Settings > Configure > shortcuts...| X | razor tool | C | or right, backward one frame | A | zoom in |
| S | select | V | or left, forward one frame | Z | zoom out |
| D | delete selected item | L / J | Fast forward / Rewind | Q | fit zoom to project -very useful too |
| Shift-X | cut clip (at seek point) | E | or end key, go to clip end | G | insert marker |
| M | spacer tool | W | or home key, go to clip start | Alt-N | create folder |
| P | snap to toggle |
2. Adding clips to the Timeline
Quick
Select the needed clips (or click in the clip tree and CTRL-A) and drag down to the time-line, they will snap to the start as you move them close.-if the film looks too long and you need less clips on the time-line, press D as soon as they are dropped there (to remove the whole lot from Timeline) and the duration will be given.
-also you can press Q to show the whole length of the clips in Timeline, without them going off the end.
at this moment it is good to click the save icon (CTRL-S) and give the project a name.
now click on the Project Monitor tab (the marker will be set to the start of the project) and the project will start playing, pause with Space (or press L to fast forward).
Specific
- Select a clip in the Project Tree and play it in the Clip Monitor (check it under View menu)
- Play/pause with Space, or by clicking on the Monitor, and then set in and out points with buttons or I and O
- Click on the Clip Monitor and drag it down to the Timeline and the selected part of the clip (within the in/out points) will be added to the Timeline, wherever you like.
- You can use I and O while the video plays
- Use Shift-left or Shift-right to move one second forward/backward, or C or V ( left/right ) to move by one frame
- You can also use the mouse scroll button on the duration bar, alone to move by frame, with Ctrl to move by seconds
- Use Shift-I to reach the zone start, or Shift-O to reach zone end
- Use home to reach clip start, or end to reach clip end
- Use Ctrl-home to reach project start, Ctrl-end to reach project end (my shortcuts W and E )
3. Using sub-clips
Similarly as above, play a clip in the clip monitor and set in/out points with I and O , then click and drag from the Clip Monitor to the Project Tree -the clip segment will be listed under its parent clip (with time of segment start).Thus the segment of the clip (between in/out points) becomes a sub-clip in the Project Tree (much like a bookmarked part of a clip) ready for use on the Timeline.
-select the parent clip in the Project Tree to make more sub-clips
-select a sub-clip, adjust the in/out points in the Clip Monitor and the sub-clip will be updated.
Another way, you can right click on the Monitor and click on Extract Zone, to save the clip segment as a file, and list it in the Project Tree.
This method makes for a good video cutter! Works cutting h264 film. It's just that joining files you have to render them, there's no joiner!
4. Cutting clips on the Timeline
when you hit a part of the clip that's unneeded, pause with Space, find the exact place to make a cut by moving backwards/forwards by one second ( Shift-left or Shift-right ) or by one frame ( C and V or left/right key)You can also use the mouse scroll button on the Monitor, using normal scroll for moving frame-by-frame in the video from the seek point, or holding Ctrl with the mouse scroll to move a second at a time.
-Zoom in with A to get to a more accurate place to cut the clip ( Ctrl-mouse scroll button on the Timeline as well)
-then click on the clip in Timeline to highlight it and use Shift-X to cut at the seek point or press X for the razor/sissor tool and click on the clip at the seek point (not accurate).
But you may need to cut the clip just before/after some audio part, so to do that you need to click at a point under the clip and hit Space to play. Keep adjusing where you click and play from, but keep the mouse at that point. Once you have the exact place to cut, switch to cut tool with X, and click on the clip at the cursor (press A to zoom in if needed.)
-press S and click on the part to remove to select it.
-press D to remove it.
-right click in the empty space and press R to close the gap (or you can leave the gaps and close them later)
! Caution! If you close a gap and you have clips on multiple Video/audio tracks then only one track moves along, disrupting the alignment. Therefore it is better to use the Spacer tool with M in that case and drag the whole proceeding part of the project up.
Instead of cutting, you can just drag the ends of a clip to change the clip's length i.e. make the clip "time out" before it's end or beginning - to do this hover near the clip end and select and drag the green arrow that pops up.
To get this more accurate, you can seek where the clip needs to begin or end, and as you drag the actual beginning or end of the clip, it will snap to the seeking line.
To make this even faster, select the clip and press 1 to move the selected clip's start point up to the seek point, or 2 to move the clip's end point up, which does the same as dragging start/end.
Another way, if you know exactly how much time a clip should duress, you can double click on a clip on Timeline and set start/end points.
However, if you only need to cut a piece out of a clip, it will not help if you reset the start or end of the clip, you will need the razor tool or Shift-X on seek point at the start and end of the piece to remove.
Keep saving the project as you go along -just in case there's a crash!
Note about frozen frames after joining MTS clips
The only way to get around this problem (unless its fixed in a new build of MLT) is to overlap the near end of the clip to the right onto the far end of the previous clip. So to do this, turn on "Overwrite mode" (button at bottom left) and just move up the clip on the right so that it overlaps the end of the clip to its left.But to do this while editing, just click the point at which normally you'd cut the clip (to remove the end) and then overlap the clip on the right (move it to the left) up to the seek line.
If you've already made edits, cutting clips, and you want to overlap clips, you'll need to use the move tool to move all the clips to the right, to make some space.
-click on the first clip and press "end" key to set the seek at the clip end.
-Try to move the clip out to the right by hovering the end and dragging on the green arrow.
-If it moves out (which means you made a cut there) then move it a little way, and then hit S and drag the clip on the right to overlap, up to the seek point (which will be where you wanted the clip to be cut).
-If it doesn't move out (means there's no cut made) then you'll just have to overlap the clip on its right a little on it.
-Do that for all clips on the project time-line before rendering.
Results?? No more frozen frames at all. But, there may be some audio artifact found at joins! A very short crackle at the start of new clips. :(
Other notes
- The spacer tool M is used to move all the clips up along the track and make some space to insert a clip.
- You can select multiple clips in the time-line by right-click and Group clips (or CTRL-G), then CTRL-click on clips.
Release CTRL to move them all together.
But if you want to move them to another part on the time line you'll have to move them onto the second row and then along. - if on occasion Kdenlive deals badly with a certain clip and it appears frozen when you play it in the time-line, it's most likely that the camera did something to it, a write error.
- Say you've been working on a few clips on the Timeline and you'd like to use that edit in another Project... you can't drag the in/out zone to the Project Tree, unfortunately, so you have to save that and import the saved project as a clip to the Project Tree in the new Project.
- But if you have been using proxy clips in the project you want to import, very strangely the new project will put the proxy files into the rendered film! So you need to turn off proxy clips (select all and right click > Proxy Clip) and save the project before importing it to another project :(
5. Adding Sub-titles
to add sub-titles you need to make a Title clip, with transparent back-ground. Move the clip which the Title clip will coincide with down onto video track 2, drag the Title clip from the Project Tree on to Track 1 and resize it to the right duration.6. EFFECTS
there is a huge amount of effects available.if adjusting brightness (RMB on clip in the timeline >Add Effect >Colour Correction)
stretch the Effects Stack so you can adjust the value manually
- increase brightness: you need to increase the contrast also (RMB on clip in the timeline >Add Effect >Colour) and perhaps saturation a very little
- increase brightness from 500 to 700 and contrast from 250 to 350 for example and adjust further until the right colour is obtained
- if reducing brightness there's no need to adjust contrast
To apply an effect to multiple clips,
- add an effect to a clip, then right-click and select copy
- select other clips with Ctrl, or Ctrl-A to select all,
- right-click again and select Paste effects
7. Rendering / Encoding
when ready, click on the Render icon on tool bar or press R !You can also render a selection of the project by using the in/out zone markers -set these by pressing I for the in marker and O for the out, then in render dialogue check "selected zone".
Another way is to set guides and that way you can chop up the finished movie into segments and render each segment at a time.
set a guide at the end of a clip: press "end" key, use shortcut G for Add marker/guide quickly.
- Note that the guide will stick to its time placement, so if you close up gaps or make edits before it on the timeline, the guide will need moving again (it will drag and snap to a clip end).
- If you are making a few films on the same timeline, it would be better to separate last and first clips with some blank space and set the marker in the space, probably closer to the first clip of the next film.
In the render dialogue select the area on the project to be encoded Full.. Selected Zone.. Guide Zone. then render or generate a script to render it later.
You can also create your project, set the render options and make a script for it so that it can be started later - this will give you maximum system resources with which to play and seek the clips of another project.
When ready to make the next project from other files, click on New. Trying to remove the clips from the time-line is a bit of a pain, and unnecessary. You can however, clear the timeline if you need to, with just Ctrl-A and press D (with Timeline active)
Rendering projects to different movie formats
I often render a "raw-ish" copy of my film to mpeg2 @ 12000 K bitrate, which is an easier format to deal with later.Then to h264 @ 2000 K, resized to 1024p, for viewing on mobile devices, which gives OK video quality. Without rescaling, video from 1080 profile will easily merit HD display on a video share website.
I'll make a lower quality mp4 render for some cases where laptop performance is low or where a DVD player can handle mp4 movies from flash stick.
For making DVD's, I'll render the same project to DV/DVD (must change project profile to 25 fps) which renders @ 8000 K bitrate and the result is 720p. This can be added to a DVD project in bombono with ease.
EXPERIMENTAL: TO FORCE WIDESCREEN PLAY OF 16:9 VIDEO ON A 4:3 DISPLAY, SELECT DVD 4:3 WITH THE 16:9 SOURCE. YOU GET A 16:9 PICTURE ON A 4:3 SCREEN -BUT NO GOOD FOR A WIDESCREEN TV.
Add your best encoding profiles to favorites.
Rendering takes time! The faster your processor the better. I would leave the render queue going all night on my Intel dual core.
If you are confident with your rendered film then you can dispose of the MTS files, unless you want to keep them for a while.
Notes
- It's wise to keep a task manager open to kill either kdenlive or another process eating the RAM.
- Kdenlive can sometimes work up some big mem usage, and that means closing it and restarting once memory is freed up -but that dpends on how much memory you have installed! (It was tricky having only 4gb all shared out).
- [old problem: h264 render "crashes" at the end - the rendered file is usually OK, so check it]
- [old problem: h264 clips with proxy clips turned on can strangely become double length, with white blank part on the end. Just turn off proxy for that clip and turn on again and the clip is restored to correct length.]
- if app crashes/freezes during render, the render will still complete (at least the one already sent to MLT), so wait for it to finish.
- send projects to script so that you can start the render again if there's a crash.
- watch the project profile -make sure it fits your target film size -don't put 1024x576 clips through HD 1080 profile as they will get larger - stretched to 1920x1080.
- To resize video, check "Rescale" in the render dialogue and set the values to what you need.
- if you use a guide to split a project up into parts on the timeline, put the guide in blank space, so that next clip won't get last frame of previous clip!
- be careful with interlaced files, render to progressive might get choppy
- add to tool bar: proxy clip (toggle), effect stack (toggle), insert guide, title clip, slideshow clip, fade from black, fade to black, gain, fade in/out audio
- add to extra tool bar: go to clip start/end, go to project start/end, forward 1 second/1 frame, rewind 1 second/1 frame,
- If you have problems (e.g. crash loading any clip, crash rendering, can't render) start kdenlive in terminal, use it and note any error messages after it crashes, then check the forums
also you can test your ffmpeg is installed properly with a command ffmpeg
and your melt install with melt
Avidemux
If cutting up mp4/m4v/h264 you are limited to making cuts only on KEYFRAMES! If you cut on any frame between it will cause smearing of where the frames get joined in the resulting movie - ie, blocky or jittery picture tor a split second.It's much easier to cut up an mpeg2 film, while using Same for video and audio, but +40 ms to correct the audio lag. Still best to use key frames for cuts as mpeg2 is also compressed.
More on Avidemux on the next page, Dvd-authoring.
Bombono
add the vob files made with the Kdenlive DVD render to bombono and create ("render only") the DVD ISO (which you can move to a folder).I used to use DVD Styler, but it remuxes the films (whether 720p mpeg2 or vob files) and that takes a long time.
Then burn the DVD iso file, from command line with:
(use /dev/dvd1 or /dev/dvd2 for an external DVD writer)
Handbrake
convert 1920p mpeg2 with h.264 codec 2pass @ 2500 kbps for Youtube.Convert to mp4 with mpeg4 codec @ constant quality=8 and resize to 820p for showing on TV with a thumb-drive.
Also just "decomb" the video (Picture settings >Filter), don't force deinterlace, as not all frames are interlaced, so combing gets those that are and the result is a nice picture.